Ah, sweet lemons. I love them.
They smell sour, taste sour, and somehow get away with it. All the time!
I can't get away with acting and smelling sour EVER! Someone is always there to tell me about it and read my the riot act.
I envy these little juicy fruits. They're sassy, and loving it. And everyone else seems to agree that sassy is okay for these little yellow bulbs.
It just doesn't seem fair. Why can they get away with being sassy and I can't?
Oh, well, that will take too long and I have only a few minutes to tell you that my honey's nieces, nephew, and their friends ate almost the entire pan.
They had no idea it was healthy and they ate at least three pieces each! I kid you not. Their mom was worried about sugar and I couldn't get her alone to tell her that things would be okay.
This is another July 4th winner. Easy to make (aka- starts with a cake mix), but fresh flavors make this a surprisingly light cake... perfect for a hot summer evening!
Okay, let's get started!
Lemon Cake with Caramel Apricot Glaze
1 Package Yellow Cake Mix (Sugar free if you can find it)
3 tbsp. Lemon Juice
2 tbsp. Lemon Zest
1 Egg
1 Cup No Sugar Added Apple Sauce
1/2 Cup Water
Caramel Apricot Glaze:
1 Cup Apricots
1/2 Cup Sugar Free Caramel Sauce
1/2 Cup Sugar Free Maple Syrup
3 tbsp. Lemon Juice
1/2 Cup Graham Crackers; smashed into dust
1. Preheat oven to 350 degrees and grease a 9 X 12 baking dish
 2. In a large bowl combine the cake mix, lemon juice, lemon zest, egg, apple sauce, water. Pour into the baking dish and bake in the oven for 33-40 minutes. A toothpick inserted in the middle should come out clean.
3. Let the cake cool. Meanwhile combine the apricots, caramel sauce, and lemon juice in a food processor and process until smooth.
4. Then spread over the top of the cooled lemon cake.Top with the graham cracker dust. Serve immediately or chill in the refrigerator until ready to serve.
Garnish with thinly sliced strawberries if desired.
Servings: 24
Nutritional Skinny:
127 calories / 2 g fat / 27 g carbohydrates / 1 g fiber / 1.7 g protein
Mental Health Benefit: By eliminating all of the oil from the original bake box recipe we have eliminated almost all of the fat. And by substituting apple sauce we are increasing the fiber and adding vitamins A, C, and bringing antioxidants to this party with the apricots. Not to mention that we are adding fruit to this recipe with the caramel apricot glaze that tastes delicious with the tart lemon and compliments the caramel perfectly. In short, this recipe went from 240 calories to a small 127. That's a savings of over 100 calories!
2. In a large bowl combine the cake mix, lemon juice, lemon zest, egg, apple sauce, water. Pour into the baking dish and bake in the oven for 33-40 minutes. A toothpick inserted in the middle should come out clean.
3. Let the cake cool. Meanwhile combine the apricots, caramel sauce, and lemon juice in a food processor and process until smooth.
4. Then spread over the top of the cooled lemon cake.Top with the graham cracker dust. Serve immediately or chill in the refrigerator until ready to serve.
Garnish with thinly sliced strawberries if desired.
Servings: 24
Nutritional Skinny:
127 calories / 2 g fat / 27 g carbohydrates / 1 g fiber / 1.7 g protein
Mental Health Benefit: By eliminating all of the oil from the original bake box recipe we have eliminated almost all of the fat. And by substituting apple sauce we are increasing the fiber and adding vitamins A, C, and bringing antioxidants to this party with the apricots. Not to mention that we are adding fruit to this recipe with the caramel apricot glaze that tastes delicious with the tart lemon and compliments the caramel perfectly. In short, this recipe went from 240 calories to a small 127. That's a savings of over 100 calories!
Deliciously nutritious. That's what I'm about!
July is almost here! Can you believe it? Where does the time go? I have no idea. None whatsoever.
It feels like yesterday when I was 12-years old playing on the slip in slide, cursing my new curves that hurt every time I hurled myself on the slippery wet tarp.
Oh well, those were the days...
But I do know that July 4th will be here in only a few days. With that in mind, I wanted to share some of my all time favorite recipes for summer barbeques and potlucks, which you all may be attending this weekend.
This Summertime Italian Tomato, Cucumber, and Basil Salad is one of my all time favorite recipes. I bring it on camping trips, to work potlucks, to family gatherings, and serve it alongside everything from brats to steaks.
The two best things about this recipe is that:
1) It's easy to make, just chop and dress, and
2) It's super versatile. You can use any vegetables and cheese combination and never go wrong. If you have squash instead of cucumber.. use it! If you have feta cheese instead of mozzarella... Go ahead! It's almost fool proof.
The component that makes this salad are fresh tomatoes, the chick peas, basil, and cheese. As long as you have those four ingredients the rest is history and will be amazing!
 The refreshing mix of fresh vegetables and yummy salty cheese make this a winner and a great compliment to ANYTHING! And, I'll bet you have almost everything you need already in your fridge!
So lets get started!
Italian Summertime Tomato, Cucumber, and Basil Salad
3 Ripe Vine Ripened Medium sized Tomatoes
1 Large Asian Cucumber
4 Cloves Garlic; Minced
1/2 Medium-sized Red Onion; Diced Finely
1 Can (15.5 oz) Garbonzo Beans; Drained and Rinsed
1/4 Cup Fresh Basil; Minced (you can also use 2 tbsp. dried basil)
4 Ounces Mozzarella Cheese; Cubed (you can also use feta, jack, or Gorgonzola)
1 tsp. Black Pepper
1/2 tsp. Salt
1/4 Cup Paul Newman's Light Balsamic Dressing
1 tsp. Lemon Juice
1. Get all your vegetables together with a cutting board and your favorite knife. Slice the tomatoes into bite sized pieces. I like to slice the tomato along the round and then slice across both ways. Slice the cucumber into bite sized pieces as well as mincing the garlic and dicing the red onions.
 2. Toss all of the vegetables into a large bowl. Drain and rinse the garbonzo beans and add those to the bowl. Then add the minced fresh basil and the cubed cheese.
3. Add the salt, pepper, light balsamic dressing, and lemon juice. Toss together with a spoon to coat. Refrigerate for an hour or overnight. Overnight is best because it gives all the flavors a chance to really marinate and blend together.
2. Toss all of the vegetables into a large bowl. Drain and rinse the garbonzo beans and add those to the bowl. Then add the minced fresh basil and the cubed cheese.
3. Add the salt, pepper, light balsamic dressing, and lemon juice. Toss together with a spoon to coat. Refrigerate for an hour or overnight. Overnight is best because it gives all the flavors a chance to really marinate and blend together.
Servings: 12 ( approximately 1/2 Cup)
Nutritional Skinny:
85.5 calories / 3.8 g fat / 9 g carbohydrates / 1.6 g fiber / 4.6 g protein
Mental Health Benefit: This recipe is not only a chop and drop style recipe making it super easy to make, but it is loaded with vegetables and beans! Do you know what that means? Tons of vitamins A, C, and B and fiber from the garbanzo beans with virtually no fat per serving! Most of the fat comes from the cheese and if you are using reduced fat cheese, then you also have the bonus of some calcium. Plus it's fresh and bright flavors are the perfect compliment to a hot summer day!
The idea for these burgers came after my trip to Lake Charles, Louisiana. I was with girlfriends soaking up the hot humid afternoons on the lake tasting saltwater on my lips after a long swim.
When a girlfriend mentioned how amazing this Slap Yo Mama seasoning was. "Slap Yo Mama"? It sounds just ridiculous even for me. Dinner is so good that you slap yo mama? I'm not sure that I would have ever gotten away with that in my house.
I can just imagine the aftermath from the smack. Me explaining myself to my dad that it was just so yummy that I had to slap my mom? Nope. Wouldn't have worked.
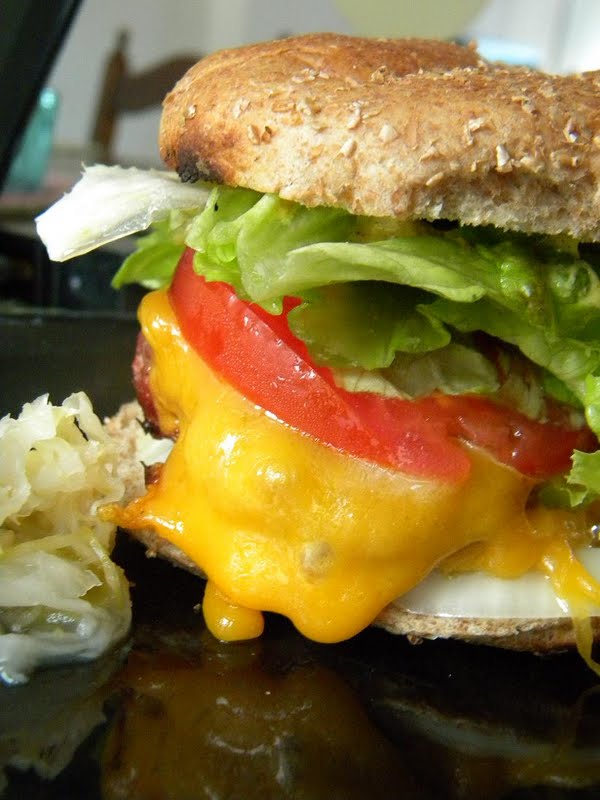
But this seasoning is just that good. Mixed with these burgers there is some heat that brings out the natural meat flavors in the beef. Pair that with some sharp cheddar cheese melted and gooey on top and it's heaven. But then you add some fresh lettuce and vine ripened tomatoes from the farmer's market.
And well, I needed at least two bites to tell you from personal experience.. these burgers are so delicious that I wanted to go back for seconds. Even just writing about that rich spice and juicy cheese drenched burger is making me salivate.
Now I realize you all might not have gone to Louisiana to pick up Slap Yo Mama. So I did some digging on the internet and this is exactly what I'm talking about. This is the Slap Yo Mama - Hot version that I picked up because I like things a little spicy. If you want it just flavorful and not too spicy you can use this Cajun Version instead .
Do yourself a favor and get a shaker of it. You can add it to soups (which we did and it's a tad bit more powerful in broth) or meatloaf, make a spicy mayo, or just sprinkle it on a steak. The sky's the limit.
Ok, on with the recipe... Are you ready?
Here we go!
Slap Yo Mama Burgers
2.5 Pounds 99% Lean Ground Beef
3 tsp. Slap Yo Mama Louisiana Spice
2 tsp. Garlic Powder
2 tsp. Onion Salt
2 tsp. Black Pepper
10 Slices Sharp Cheddar Cheese
1. In a large bowl combine the ground beef, slap yo mama spice, garlic powder, onion salt, and black pepper. Mix together with your hands until all spices are incorporated throughout the meat.
2. Form into eight even sized patties and create a shallow whole in the middle of each to allow for even cooking. Place the patties on a cookie sheet and keep refrigerated until you are ready to start grilling.
3. Preheat your grill to medium high heat. Brush the grill grates then spray with cooking spray. Once hot add the burgers to the grill and cook for 5 minutes on each side.
4. In the last minute of baking add a slice of cheese to each burger and place the whole wheat buns on the top rack to warm. Once cooked through, place the burgers on a clean cookie sheet and allow to cool for 1-2 minutes for juices to distribute. Then serve with whole wheat buns, mustard, and your favorite condiments!
Servings: 10 (4 ounce burger only with cheese)
Nutritional Skinny:
273 calories / 17 g fat / .4 g carbohydrates / 0 g fiber / 29 g protein
Mental Health Tip: Using ground beef isn't exactly the healthiest choice, but sometimes it's just unavoidable. In order to help the whole meal, I served these on whole wheat buns with fresh lettuce and tomato and mustard. The whole wheat buns added whole grains and fiber to the meal and a healthy carbohydrate and the fresh veggies added a nice bite to the burgers and some vitamin C and A. Overall, this meal had tons of protein from the lean burger meat. However, you can easily substitute ground turkey if you are wanting to further cut fat. It is just as yummy! I also served sauerkraut on the side instead of chips, no fat and cabbage is great for us, plus you still get that salty thing you might be craving!
.
Do yourself a favor and get a shaker of it. You can add it to soups (which we did and it's a tad bit more powerful in broth) or meatloaf, make a spicy mayo, or just sprinkle it on a steak. The sky's the limit.
Ok, on with the recipe... Are you ready?
Here we go!
Slap Yo Mama Burgers
2.5 Pounds 99% Lean Ground Beef
3 tsp. Slap Yo Mama Louisiana Spice
2 tsp. Garlic Powder
2 tsp. Onion Salt
2 tsp. Black Pepper
10 Slices Sharp Cheddar Cheese
1. In a large bowl combine the ground beef, slap yo mama spice, garlic powder, onion salt, and black pepper. Mix together with your hands until all spices are incorporated throughout the meat.
2. Form into eight even sized patties and create a shallow whole in the middle of each to allow for even cooking. Place the patties on a cookie sheet and keep refrigerated until you are ready to start grilling.
3. Preheat your grill to medium high heat. Brush the grill grates then spray with cooking spray. Once hot add the burgers to the grill and cook for 5 minutes on each side.
4. In the last minute of baking add a slice of cheese to each burger and place the whole wheat buns on the top rack to warm. Once cooked through, place the burgers on a clean cookie sheet and allow to cool for 1-2 minutes for juices to distribute. Then serve with whole wheat buns, mustard, and your favorite condiments!
Servings: 10 (4 ounce burger only with cheese)
Nutritional Skinny:
273 calories / 17 g fat / .4 g carbohydrates / 0 g fiber / 29 g protein
Mental Health Tip: Using ground beef isn't exactly the healthiest choice, but sometimes it's just unavoidable. In order to help the whole meal, I served these on whole wheat buns with fresh lettuce and tomato and mustard. The whole wheat buns added whole grains and fiber to the meal and a healthy carbohydrate and the fresh veggies added a nice bite to the burgers and some vitamin C and A. Overall, this meal had tons of protein from the lean burger meat. However, you can easily substitute ground turkey if you are wanting to further cut fat. It is just as yummy! I also served sauerkraut on the side instead of chips, no fat and cabbage is great for us, plus you still get that salty thing you might be craving!
I've always been sort of enamored with Focaccia bread. The kind of infatuation I feel when I look at a picture of Chris O'Donnell. Yeah, he's got that cute boy next door thing that I find irresistible. I fantasize that one day he'll call me up and want to take me out.
It's always been this just out of reach kind of love. Like my high school crush who never knew I was alive. Probably still doesn't.
But that's beside the point. The real point is that I was tired of this useless longing. Even though it's finally like 90 degrees here, I wanted to get my hands dirty, turn on the oven, and french kiss this thing. Full mouth to bread crumbs.
I found a few great recipes and 'hot messed' them a bit and started mixing, kneading, and laughing.
Next thing I know the bread is rising. I'm smiling while I press olives and pepperoni in the skin of the bread and within a few short hours this longing turns to satisfaction.
With the bread fresh out of the oven I can't help but take one big bite. Just to make sure it's real and as yummy as I remember.
Unlike high school reunions where the crush may have put on a few pounds and be less than you fantasized, this focaccia is just what I dreamed about.
I can't tell you if I like the Green Olive and Rosemary better or the Pepperoni and Sun-dried Tomato Focaccia. It would be like choosing your favorite child... I just can't do it.
Then I sliced it and the sky was the limit!
 I started by making a Ham and Cheese Panini. My honey would call it a grilled cheese, but I prefer the chef-y sounding word. It was delicious!
All you do is spray a skillet heated to medium. Add the focaccia yummy side in and them place a few slices of ham and cheese. Then top with another slice of focaccia (yummy side in again). Here's where the panini comes in. Take a cookie sheet and place it on top of the sandwich then take something really heavy, a brick, cast iron skillet, heavy cook book, whatevs and smash the whole sandwich down. I mean really really smoosh it.
I started by making a Ham and Cheese Panini. My honey would call it a grilled cheese, but I prefer the chef-y sounding word. It was delicious!
All you do is spray a skillet heated to medium. Add the focaccia yummy side in and them place a few slices of ham and cheese. Then top with another slice of focaccia (yummy side in again). Here's where the panini comes in. Take a cookie sheet and place it on top of the sandwich then take something really heavy, a brick, cast iron skillet, heavy cook book, whatevs and smash the whole sandwich down. I mean really really smoosh it.
Cook on both sides for about 5 minutes or until cheese gets ooey gooey! Then eat it!
Or you can just make a regular old Mozzarella and Turkey Sandwich... oh so yummy. The bread was hearty and the cheese and turkey were the perfect middle!
Whatever you decide to do with the Focaccia bread you won't be disappointed.
Let's get started with the basics...
Basic Focaccia Dough
**Note: This makes two focaccia loaves.
1/2 tsp. Powdered Sugar
2 tsp. Dried Yeast (1 package)
4 cups All Purpose Flour
4 cups Whole Wheat Flour
2 tsp. Salt
3 tbsp. Olive Oil
3 Cups Lukewarm Water  1. Combine the powdered sugar and yeast. Add 1/4 cup warm water. Stir together with a fork to combine and allow to sit until it bubbles and foams.
 2. In a large bowl, mix the flours and salt. Stir together to combine. Then add the olive oil, yeast mixture, and 2 cups of the warm water. Stir with a wooden spatula to combine. Then slowly add the remaining cup until the stiff dough forms. It will be drier, but that is perfect.
3. Transfer the dough to a lightly floured surface and knead for 5-8 minutes. The dough will be smooth and well combined and when you make an impression with your finger the dough should spring back immediately.
2. In a large bowl, mix the flours and salt. Stir together to combine. Then add the olive oil, yeast mixture, and 2 cups of the warm water. Stir with a wooden spatula to combine. Then slowly add the remaining cup until the stiff dough forms. It will be drier, but that is perfect.
3. Transfer the dough to a lightly floured surface and knead for 5-8 minutes. The dough will be smooth and well combined and when you make an impression with your finger the dough should spring back immediately.
 4. Place a small amount of olive oil in the bottom of a large metal bowl and place the dough into the bowl turning it to coat the outside with olive oil. Gently cut an "X" in the top of the dough so it can stretch without breaking. Then cover the bowl with plastic wrap and a towel and place in a warm place to rise for one hour.
5. After one hour, punch the dough down to it's original size and cut the dough in half making two even balls of dough. Gently stretch the dough into a 11 X 8 rectangle using the palms of your hands and lifting and stretching the dough where needed.
4. Place a small amount of olive oil in the bottom of a large metal bowl and place the dough into the bowl turning it to coat the outside with olive oil. Gently cut an "X" in the top of the dough so it can stretch without breaking. Then cover the bowl with plastic wrap and a towel and place in a warm place to rise for one hour.
5. After one hour, punch the dough down to it's original size and cut the dough in half making two even balls of dough. Gently stretch the dough into a 11 X 8 rectangle using the palms of your hands and lifting and stretching the dough where needed.
 6. Lightly grease a cookie sheet and sprinkle with cornmeal. Then lay each dough rectangle on it's own cookie sheet. Place plastic wrap and a towel over and place back in the warm spot to rise for another 2 hours. Check the dough after an hour and half to see if it's doubled in size. We don't want to over-rise the dough!
7. Preheat the oven to 425... now we are ready to choose which kind of focaccia would make your heart sing today!
Green Olive and Rosemary Focaccia
6. Lightly grease a cookie sheet and sprinkle with cornmeal. Then lay each dough rectangle on it's own cookie sheet. Place plastic wrap and a towel over and place back in the warm spot to rise for another 2 hours. Check the dough after an hour and half to see if it's doubled in size. We don't want to over-rise the dough!
7. Preheat the oven to 425... now we are ready to choose which kind of focaccia would make your heart sing today!
Green Olive and Rosemary Focaccia
 1 Foccacia dough (recipe above)
1/2 cup Green Olives
1 tbsp. Olive Oil
1 tbsp. Rosemary
1 tsp. Salt
1. With oven preheated to 425, place the olives whole evenly on the top of the focaccia pressing down lightly to sink the olives within the dough. Brush the olive oil gently over the surface of the dough. Then sprinkle the dough with the rosemary and salt.
2. Bake in the oven for 20 minutes!
3. Slice and serve alongside your favorite salad or slice it thin for a delicious sandwich!
Servings: 18
Nutritional Skinny:
1 Foccacia dough (recipe above)
1/2 cup Green Olives
1 tbsp. Olive Oil
1 tbsp. Rosemary
1 tsp. Salt
1. With oven preheated to 425, place the olives whole evenly on the top of the focaccia pressing down lightly to sink the olives within the dough. Brush the olive oil gently over the surface of the dough. Then sprinkle the dough with the rosemary and salt.
2. Bake in the oven for 20 minutes!
3. Slice and serve alongside your favorite salad or slice it thin for a delicious sandwich!
Servings: 18
Nutritional Skinny:
118.6 calories / 2 g fat / 21.4 g carbohydrates / 2 g fiber / 3.6 g protein
Pepperoni and Sun-dried Tomato Basil Focaccia
 1 Foccacia Dough (recipe above)
1 tbsp. Olive Oil
1/8 cup Pepperoni; sliced thin
1/8 cup Sun-dried Tomatoes
1 tbsp. Basil Leaves (fresh or dried)
1 tsp. Salt
1. With oven preheated to 425, mince the pepperoni and sundried tomatoes.
2. Lightly brush the olive oil over the top of the focaccia dough and sprinkle over the surface of the dough. Sprinkle the basil and salt over the top.
3. Bake in the oven for 20 minutes.
1 Foccacia Dough (recipe above)
1 tbsp. Olive Oil
1/8 cup Pepperoni; sliced thin
1/8 cup Sun-dried Tomatoes
1 tbsp. Basil Leaves (fresh or dried)
1 tsp. Salt
1. With oven preheated to 425, mince the pepperoni and sundried tomatoes.
2. Lightly brush the olive oil over the top of the focaccia dough and sprinkle over the surface of the dough. Sprinkle the basil and salt over the top.
3. Bake in the oven for 20 minutes.
 4. Slice and serve! Delicious as a sandwich with mozzarella cheese and fresh tomatoes inside!
Servings: 18
Nutritional Skinny:
122 calories / 2.2 g fat / 21.4 g carbohydrates / 2 g fiber / 4 g protein
Mental Health Tid Bit: Okay, this is not about how healthy it is. This is about the right to brag that you made HOMEMADE FOCACCIA! Yeah, you can bring this to your best friends house and brag that you did this all by yourself from SCRATCH! Now I think that's worth something.. don't you? Bon Apetit!
4. Slice and serve! Delicious as a sandwich with mozzarella cheese and fresh tomatoes inside!
Servings: 18
Nutritional Skinny:
122 calories / 2.2 g fat / 21.4 g carbohydrates / 2 g fiber / 4 g protein
Mental Health Tid Bit: Okay, this is not about how healthy it is. This is about the right to brag that you made HOMEMADE FOCACCIA! Yeah, you can bring this to your best friends house and brag that you did this all by yourself from SCRATCH! Now I think that's worth something.. don't you? Bon Apetit!
I did something kind of crazy the other day.
I know... Not really shocking. But it turned out sort of delicious.
I made some spaghetti, tossed in some yummy sun-dried tomatoes, spinach, pesto, and cheese.
 Now this is typically where you stop and sit down to eat, right? Well, I had it in my head that I wanted finger foods. Spaghetti isn't really 'finger friendly' if you know what I mean.
So, I swirled the spaghetti into muffin tins, poured egg over the top, and added mozzarella cheese and then baked them.
 Yep, I made Pesto Spaghetti Mini-Quiches. I think it's sort of a girl thing. This whole 'making things cute' and 'having sweet little names' for everything.
My honey called them Spaghetti Cupcakes, which is pretty hilarious. He came to me eating one and said, "Hey honey? These spaghetti cupcake things are yummy." And then he popped the whole thing into his mouth.
Yep, it's a girl thing. But to me they're Pest Spaghetti Mini-Quiches.
But you call them whatever you like. They are delicious and you can add whatever you have on hand that's what makes this recipe so versatile and easy. And you can hide vegetables from picky eaters inside the spaghetti and egg. They'll never know!
Having a father's day brunch this Sunday? Wanting to make something really special and kind of different to make sure your dad knows just how much you care?
You care enough to make Spaghetti Cupcakes. Now that's something!
Happy Father's Day all you dad's out there! Enjoy the Spaghetti Cupcakes!
Now, on with the recipe!
Pesto Spaghetti Mini Quiches
 1/2 Box Whole Wheat Pasta Noodles
1 tsp. Olive Oil
2 tbsp. Garlic; Minced
2 cups Fresh or Frozen Spinach
2 tbsp. Sun-dried Tomatoes; Minced
1 Cup Ham; Minced
1 Package Dry Pesto Mix
1/4 Cup Parmesan Cheese
5 Eggs
1 Cup Egg Whites
1/2 Cup Fat Free Milk
2 Tbsp. Italian Seasoning Blend
1 Cup Mozzarella Cheese; Shredded
1/2 Box Whole Wheat Pasta Noodles
1 tsp. Olive Oil
2 tbsp. Garlic; Minced
2 cups Fresh or Frozen Spinach
2 tbsp. Sun-dried Tomatoes; Minced
1 Cup Ham; Minced
1 Package Dry Pesto Mix
1/4 Cup Parmesan Cheese
5 Eggs
1 Cup Egg Whites
1/2 Cup Fat Free Milk
2 Tbsp. Italian Seasoning Blend
1 Cup Mozzarella Cheese; Shredded
 1. Cook spaghetti noodles according to package instructions. Strain reserving 1/4 cup of the pasta water and transfer to a large bowl.
2. Preheat oven to 350 degrees and grease two muffin tins.
1. Cook spaghetti noodles according to package instructions. Strain reserving 1/4 cup of the pasta water and transfer to a large bowl.
2. Preheat oven to 350 degrees and grease two muffin tins.
 3. Heat a large skillet and add a splash of olive oil, the minced garlic and the spinach. Cook until spinach is wilted, about 3-4 minutes. Then remove from heat.
4. Add the sauteed spinach to the bowl with the cooked pasta. Toss with tongs and then add the sun-dried tomatoes, ham, the pesto mix, and the Parmesan cheese. Add the reserved pasta water to help the pesto mix to moisten and allow it spread throughout. Toss everything together. Note: You can stop right here and just start eating it if you are really hungry! This alone is delicious!
3. Heat a large skillet and add a splash of olive oil, the minced garlic and the spinach. Cook until spinach is wilted, about 3-4 minutes. Then remove from heat.
4. Add the sauteed spinach to the bowl with the cooked pasta. Toss with tongs and then add the sun-dried tomatoes, ham, the pesto mix, and the Parmesan cheese. Add the reserved pasta water to help the pesto mix to moisten and allow it spread throughout. Toss everything together. Note: You can stop right here and just start eating it if you are really hungry! This alone is delicious!
 5. Using your tongs, scoop some noodle mixture up and swirl it into a muffin cup. Repeat filling each of the muffin cups with the noodle mixture. If there's any leftover pasta, just save it or eat it for lunch tomorrow!
6. In a separate bowl combine the eggs, egg whites, milk, and Italian seasoning blend. Whisk together to incorporate and beat the eggs. Then gently pour the egg and milk mixture over each pasta cup filling each cup until at least 3/4 full with egg mixture. Push down with a fork to make sure all the noodles are saturated. Then top with the shredded mozzarella cheese.
7. Bake for 25-27 minutes. The cheese will be melted, the tops slightly browned, and some of the noodles a little crispy. Serve immediately with some fresh basil leaves and possibly some pasta sauce for dipping!
5. Using your tongs, scoop some noodle mixture up and swirl it into a muffin cup. Repeat filling each of the muffin cups with the noodle mixture. If there's any leftover pasta, just save it or eat it for lunch tomorrow!
6. In a separate bowl combine the eggs, egg whites, milk, and Italian seasoning blend. Whisk together to incorporate and beat the eggs. Then gently pour the egg and milk mixture over each pasta cup filling each cup until at least 3/4 full with egg mixture. Push down with a fork to make sure all the noodles are saturated. Then top with the shredded mozzarella cheese.
7. Bake for 25-27 minutes. The cheese will be melted, the tops slightly browned, and some of the noodles a little crispy. Serve immediately with some fresh basil leaves and possibly some pasta sauce for dipping!
Servings: 24 (per quiche)
Nutritional Skinny:
83.4 calories / 2.8 g fat / 7.4 g carbohydrates / 1.3 g fiber / 6.8 g protein
Mental Health Tid Bit: Let's say you do have some picky eaters in the house. Most people like spaghetti right? Well, if they don't like broccoli, just chop it really small and sneak it in. What about someone who doesn't like squash, same thing, chop it real fine and slip it in. Between the spaghetti and cheese you hardly notice anything else. Add some ham and they'll never know they are eating their veggies... well, unless you tell them! Enjoy!


 2. In a large bowl combine the cake mix, lemon juice, lemon zest, egg, apple sauce, water. Pour into the baking dish and bake in the oven for 33-40 minutes. A toothpick inserted in the middle should come out clean.